March 23, 2015 by sarahewrap
Ingredients:
- 1/4 c coconut oil (melted)
- 3 tbs cocoa or cacao powder
- 2 tbs honey- raw if possible
- 1 tsp stevia or truvia.
- natural peanut butter- or other nut butter- just nuts- no sugars to be the healthiest
Directions:
- Mix first 4 ingredients together
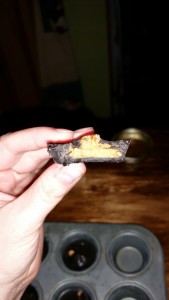
- Pour a thin- very very thin layer in bottom of mini muffin tin, just enough to cover bottom
- Place in freezer for 3-5 minutes until firm
- Remove

- Place a dollop of peanut butter in center of each cup
- Cover with remaining chocolate
- Place back in freezer to chill
- Makes 12-16 cups depending on how thick you do your chocolate
Peanut butter cups
Posted in Desserts- non-baked | Tagged 21 day fix, coconut oil, healthy, peanut butter cups | Leave a Comment »
March 22, 2015 by sarahewrap
Ingredients:
- 1 c natural peanut butter, example Adam’s Peanut butter, or other peanut butter that is just nuts
- ½ c stevia powder (not liquid)
- 1 egg
- 1 tsp pure vanilla
- 1-2 tbs water (as needed to get a non-crumbly texture)
- Optional: Crio Bru grounds (2-4 tbs)
- And/or Cacao Nibs
Directions:
- Dump first 4 ingredients in a stand mixer or bowl
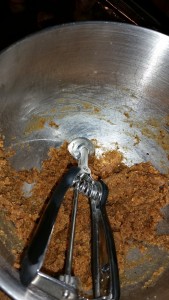
How the dough should look
- Mix them together
- Add water by the tbs until the dough is not so crumbly
- Optional- add crio bru grounds and/or cacao nibs to dough

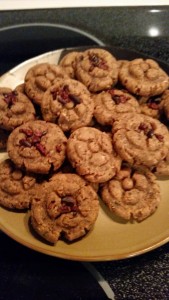
without cacao nibs
- Roll into balls- like you do for regular PB cookies- mine made 24 small cookies
- Smash each one down either with a fork or like I do, with a spool
- Bake at *350 for 12-14 minutes
- Remove from oven and leave on tray to cool
- Enjoy!!!
*there will be a bubbly oil around them on the tray as they cook, it is fine
Sugar Free Peanut Butter Cookies
Posted in Cookies | Tagged 21 day fix, baked goods, sugar free | Leave a Comment »
March 22, 2015 by sarahewrap
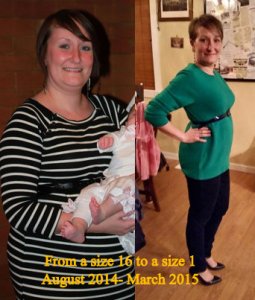 Well it has been a long long time since I have posted here, life took over. After 7 years of marriage and 4 losses, I was finally able to hold a pregnancy and in November of 2014 gave birth to a beautiful daughter who lights up our life. I am now a Beachbody Coach and have lost all my baby weigh and then some. Most of the things I now cook are healthier, but not always the best, I still love my food.
I will now try to post some of the newer things I bake and cook, some of which are 21 day fix approved, though I will not put down the containers and such, sorry.
I hope you all will enjoy some of my new recipes!!
Posted in A bit about me | Leave a Comment »
February 24, 2013 by sarahewrap
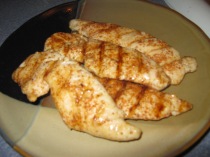
 I have been on a quest for the perfect Chicken Scampi, which is my favorite thing to get at Olive Garden, for literally years. After tons of experimentation, and a couple years living in NOLA, I finally came up with this fairly simple recipe. I always make it blackened, but you could easily omit that part and just make the sauce and even bread the chicken- or use chicken strips. We always use either penne or ziti as the pasta instead of the traditional spaghetti. We like these pastas better because they soak up more of the super good sauce in the hollow center. I hope you enjoy this as much as my husband and I do.
Blackened Chicken Scampi
(blackened- optional)
Ingredients:
- 2 chicken breasts or 4 tenderloins- approx. 1 lb
- 2 c (dried pasta) cooked- I use penne or ziti
- 1 can cream of chicken soup (I use the fat free)
- 2 tsp lemon juice
- 2 tbs minced garlic
- ¼ c white wine
- ¼ c milk
- ¼ c chicken broth
- ½ tsp black pepper
- 1 tsp Italian seasoning
- ¼ tsp crushed red pepper (optional) or
- ¼ tsp Cajun/Creole seasoning- more for seasoning chicken before browning
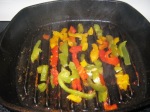
- Green peppers or mixed peppers cut up- lengthwise is best (optional)
Directions:
- Cook pasta- set aside
- Clean chicken and sprinkle w/ Cajun Seasoning
- Brown chicken- set aside
- Cook peppers until soft (optional)- set aside
- In a mixing bowl- mix together the 9 ingredients starting with cream of chicken soup- add either crushed red pepper OR Cajun seasoning- Cajun if blackening chicken
- Dump contents of mixing bowl into skillet and let it simmer for 10- 20 minutes
- Layer pasta, peppers, and chicken on a plate or in a bowl- top with scampi sauce
- Serves 2 to 4 people- Enjoy!!
Blackened Chicken Scampi

Posted in 30 minute meal, Chicken or Turkey, Pasta, Stove top | Tagged Cajun/Creole seasoning, chicken, chicken broth, chicken scampi, cream of chicken soup, crushed red pepper, dinner, food, garlic, green peppers, Italian seasoning, lemon juice, milk, pasta, pepper, wine | Leave a Comment »
November 10, 2012 by sarahewrap
 I call these the Inserra Family Chocolate Chip Cookies– but this isn’t John’s mom’s recipe, she doesn’t bake (I learned to cook and use spices from her). I actually learned to bake from my mom. She is an awesome baker. I grew up baking cookies and cakes. Every Christmas, until I moved away, we would make somewhere between 20 and 30 different kinds of cookies- some of them double batches. But, unlike my mom, I don’t just bake cookies at Christmas, I bake them year round. This is the one I make the most often and since I have a TON of baking sheets, I can make the whole batch in like a half an hour or less. It also helps that all I have to do is dump out the jar and add in the wet ingredients.
I hope you enjoy these as much as we do. You can actually add any chip you want to this recipe, be creative, maybe a mix of white, semi-sweet, and milk to mix things up? I’ve made this recipe like that before and called them triple chocolate chip cookies.
It is important to use the Crisco, if you use butter or margarine these spread quite a bit and get flat. I use Butter flavored Crisco in almost every cookie recipe, except my sugar cookies. Maybe I’ll share that one someday… who knows. I may actually try making those with Crisco in the future, just to give it a try, but I hate a wasted recipe, so I don’t know if I want to mess up my perfectly balanced, tried and true, sugar cookie recipe.
Anyways, right now you have opened my vault and gotten a glimpse at my favorite chocolate chip cookies. Enjoy!
Ingredients (Dry):
- 1 c brown sugar
- ½ c sugar
- 1 ½ c chocolate chips- or whatever chip- semi-sweet are the best!
- 2 c flour (all purpose)
- 1 tsp salt
- 1 tsp baking soda
Layer ingredients in Mason Jar- if you can’t fit chips- leave out- or on side- if for your cupboard- leave out chips- if a gift- try to add them
To bake cookies:
- 1 c butter flavored Crisco (Crisco makes a less flat cookie)
- 1 egg (large)
- 1 tsp good real vanilla- I use Mexican
Directions:
- Sift dry ingredients to remove chips (if in jar)- set aside
- Beat softened butter, 1 egg, and 1 tsp vanilla together until smooth
- Add dry ingredients
- Mix until smooth
- Add chips
- Stir into batter
- Drop cookies about 1” apart on a cookies sheet lined with tin foil- I use a cookie scoop
- Bake at 350* for 8-13 minutes
Inserra Family Chocolate Chip Cookies
Posted in Cookies | Tagged baked goods, Baking, c brown sugar, c chocolate chips, chocolate chip cookies, cookies, dessert, food | Leave a Comment »
November 10, 2012 by sarahewrap
 This is a staple in the Inserra household. John especially likes chocolate chip muffins, but I actually like cinnamon the best, the next time I make them I will take pics and post how to make this recipe as cinnamon muffins since the process is a bit different.
This is a very versatile recipe, I have included a few samples of ways I have switched up this recipe to make different flavored muffins. I hope you enjoy them as much as we do! If you do decide to make them every week or so like I do, then putting all the dry ingredients into a mason jar and storing it in the cupboard is the quickest way to go, just buy yourself a canning funnel and make up 4 or so jars at a time. These taste so much better than the box- but are just as easy.
Ingredients:
- ¾ c milk (I use whole)
- ¼ c canola oil
- 1 egg
- 2 c flour
- ½ c white sugar
- ½ c brown sugar, packed
- 2 tsp baking powder
- ½ tsp salt
- Sugar in the Raw (for topping muffins)
- 1 tsp vanilla (I use Mexican)
- 1 cup whatever ingredient you want- be creative. Try chocolate chips, semi sweet or milk, butter scotch, blueberries, raspberries, mixed berries, strawberries- whatever
- Mix it up- add 1 c apples diced and ½ tsp or so cinnamon, or ½ c craisins and ½ c white chocolate chips
Directions:
- Heat oven to 400*
- Line tin w/ papers or grease liberally
- Beat milk, oil, and eggs together in a mixing bowl with a wire whisk
- Stir in flour, sugars, baking powder, and salt; mix until just moistened (batter will be a bit lumpy)- I use my trusty kitchen aide
- Add in extra ingredient, for example, chocolate chips, stir into batter
- Divide batter amongst 12 muffin cups- they will be very full
- Top with sugar in the raw
- Bake for about 25-28 minutes, or until golden brown
Basic Muffin Recipe
Posted in Baked good- Breakfast, Breakfast/other | Tagged baked goods, breakfast, muffins | 1 Comment »
November 10, 2012 by sarahewrap
Those of you who follow my blog know all about my love of cooking, what those of you who do not know me in person do not know is that I am an excellent baker. I am actually a much better baker than cook and because of this, I kind of horde my recipes. I like to be the only one that can make certain things when I participate in a bake sale or do coffee hour after church. I still haven’t decided what recipes I will share and what I will keep to myself, locked away in my secret vault, but today I am going to post a couple of my recipes that are baked on a very regular basis in the Inserra household, muffins, chocolate chip in our house, and chocolate chip cookies- yes we LOVE chocolate here. We almost always have muffins on hand and we always have some sort of dessert and chocolate chip cookies are my husband’s favorite.
Now, I love to bake and have created quite a few recipes all on my own, some more complicated than others, but when it comes to these two items, I am a bit of a lazy baker. I don’t always want to pull out all of the ingredients, especially when it is like 7:00 pm and I just want to watch TV then do some yoga and go to bed. I would much rather just dump one of those Betty Crocker packages into my stand mixer and be done with it, but I really hate the taste of pre-packaged baked goods, I am a bit of a baked goods snob. Ok, more than a bit, I don’t think I have eaten a non-homemade cookie in at least 10 years- except for Oreo’s- homemade Oreo’s are not the same. So, I decided to pre-package my two most used recipes in mason jars.
This was the best idea I have ever had- and it makes baking cookies or muffins seem so much less like a chore- oh- and I can also just whip out a house warming gift at the drop of a hat- just cover the lid w/ some scrap fabric, tie a ribbon around it, include the directions and voila- a beautiful homemade gift.
I hope you enjoy my two most made recipes. Maybe I’ll post more, eventually.
Posted in A bit about me | Tagged Baking, chocolate chip cookies, cooking, food | Leave a Comment »
October 1, 2012 by sarahewrap
This is one of our household staples. We have it like once a month. It is totally not healthy, but oh soo good and super easy, depending on the side you make!
Ingredients:
• 2 chicken breasts
• 1- 2 peppers, diced or chopped (or 1-2 cups frozen peppers- mixed or green)
• 1 large onion, diced
• Cheddar cheese
• Olive oil
• Cajun seasoning (I use Tony Chachere’s)
• Cast iron fajita or smaller round pans (as many as people you are feeding)
• Wooden cutting boards to use as skillet placemats on at table
Directions:
1. Pound chicken until thin (I do this in a plastic zip lock bag)
2. Season both sides with Tony’s and set aside
3. Heat up skillets, add a bit of oil
4. Sear both sides of chicken, remove and set aside
5. Heat oven to 400*
6. Divide up peppers and onions to each person’s taste
7. Add peppers and onion to individual skillets, allow to cook until tender
8. Place partiality cooked chicken on top of veggies
9. Top with an ample amount of cheese
10. Place in oven and bake about 20 minutes
11. Serve the piping skillets at the table- on wooden cutting boards- restaurant style
12. Enjoy!
I usually make garlic mashed potatoes and serve that as the side. Totally not healthy- but oh so good!
Skillet Smothered Chicken
Posted in Chicken or Turkey, Stove top | Tagged Cajun or Creole Seasoning, cheddar cheese, chicken, mixed peppers, onion, stove top | Leave a Comment »
October 1, 2012 by sarahewrap
We liked the stuffed Zappy so much that when I was given a huge zucchini that was too big for my biggest 16 qt stock pot, I decided to try making stuffed zucchini a different way. I also decided that I wanted the dish to be more hearty since it was more side dish like the other way, so I added cooked brown rice, pasta sauce, and mozzarella cheese.
This turned out awesome, and it also froze well since it made more than we wanted to eat over a few days. We already unfroze the other half and it tasted perfect, just heated it up in the microwave actually and it was good to go. Even my husband liked it and he said he hated zucchini.
On a side note- I decided I want us to try to eat more whole grains, so I have now switched to brown rice, but brown rice is a real pain to cook, so after a few tries that were ok, but took F O R E V E R I finally bought a rice cooker. It was a super investment, works great and now I cook the largest amount of brown rice, which is 12 cups and freeze it in 2 cup bags to thaw when needed. So simple! I feel like Susie homemaker some days.
Ingredients:
- 2 medium or 1 large zucchini
- Olive Oil
- ½ c chopped mixed peppers- fresh or frozen (green is fine too)
- 1 small onion- diced
- 1-3 heaping tbls garlic- minced
- 1/8 tsp crushed red pepper
- Sea salt and black pepper to taste
- ¼ c parmesan cheese (shaker kind is fine)
- 1 tbsp parsley
- 1 egg, beaten
- 2-4 tbsp breadcrumbs, plain
- 2 cups brown rice (cooked)
- Pasta sauce
- Mozzarella cheese
Directions:
- Slice zucchini(s) in half horizontally and run a knife around the inside edge of each half, about ¼-inch from the skin, to loosen the pulp
- Scoop out the pulp with a spoon, leaving the zucchini shells
- Chop the pulp
- Heat a bit of oil in a skillet over medium-high heat
- Add the zucchini pulp, diced peppers, onion, and a pinch of salt to the skillet, and sauté until tender, drain liquid
- Add the garlic and sauté for about 1 minute, stirring frequently
- Remove from heat and allow to cool a bit
- In a bowl, mix beaten egg, crushed red pepper, salt and pepper to taste, bread crumbs, parsley, and cheese
- Add the cooled pulp mixture and rice (cooked), mix thoroughly
- Place the zucchini shells in a lightly greased lasagna pan or casserole dish
- Fill each half evenly with the mixture

- You can now place in refrigerator and do the rest later or next day, if needed
- Top with jar or so of pasta sauce and mozzarella cheese to taste

- Heat oven to 400*F (if coming out of fridge place dish in oven during preheat- set timer when it comes to temp)
- Bake for approximately 30- 45 minutes, serve hot and bubbly
Meatless Stuffed Zucchini
Posted in Vegetable (main dish) | Tagged bread crumbs, brown rice, crushed red peppers, eggs, garlic, mixed peppers, mozzarella cheese, onion, Parmesan cheese, parsley, pasta sauce, pepper, zucchini | Leave a Comment »
October 1, 2012 by sarahewrap
Hello blog world- I’m back! So sorry this has taken me a while to get back to, I swear I have been taking pics of my food and writing up basic recipes, but just haven’t found the time to post. Well it is time to start again.
After we moved across the country- well actually we moved more in a vertical pattern, from NOLA to Sheridan, Wyoming, I got kinda busy. We bought our first home- woo hoo!! Then I had to get my kitchen settled and go shopping so I could cook. Well, the kitchen got painted (the whole house is painted actually) and my kitchen is basically settled, except for a wall mounted pot rack which is still in the “thought” process point of being. I have a few ideas but it needs to be strong since I want to hang my beautiful cast iron on it. I’ll post pics of the kitchen when it is cleaned up.
Anyways- when we moved here quite a few very generous parishioners gave us veggies from their bounteous gardens, which was awesome, but I had no clue what a couple things were, let alone what to make with them. So I did one of the things I do best, I researched. This Zapallito, or Zappy as it is called here, was the first veggie. It turned out good but I expedited the process in my next recipe.
Ingredients:
- 1 medium zapallito (round green zucchini- looks like green pumpkin)
- Olive Oil
- ½ c chopped mixed peppers- fresh or frozen (green is fine too)
- 1 small onion- diced
- 1-3 heaping tbls garlic- minced
- 1/8 tsp crushed red pepper
- Sea salt and black pepper to taste
- ¼ c parmesan cheese (shaker kind is fine)
- 1 tbsp parsley
- 1 egg, beaten
- 2-4 tbsp breadcrumbs, plain
Directions:
- Bring a large pot filled with salted water to a boil
- Place the zapallito in water and cook until tender but still firm, about 12-14 minutes
- Transfer the zapallito to a plate or cooling rack if you have one, and allow to cool enough to touch
- Slice in half horizontally and run a knife around the inside edge of each half, about ¼-inch from the skin, to loosen the pulp
- Scoop out the pulp with a spoon, leaving the zapallito shells
- Chop the pulp and drain the liquid; leave pulp sitting in a colander to drain, and save for later
- After hollowed out, place the shells upside-down on the plate or cooling rack with a towel underneath so that the excess liquid can drain
- Heat a bit of oil in a skillet over medium-high heat
- Add the diced peppers, onion, and a pinch of salt to the skillet, and sauté until tender and lightly browned

- Add the garlic and sauté for about 1 minute, stirring frequently
- Add the reserved pulp, and sauté for about 2-3 minutes

- Remove from heat and allow to cool a bit
- In a bowl, mix beaten egg, crushed red pepper, salt and pepper to taste, bread crumbs, parsley, and cheese
- Add the cooled pulp mixture, mix thoroughly
- Place the zapallito shells on a lightly greased baking sheet or in a casserole dish
- Fill each half evenly with the mixture

- You can now place in refrigerator and do the rest later or next day, if needed
- Heat oven to 400*F (if coming out of fridge place dish in oven during preheat- set timer when it comes to temp)
- Bake for approximately 20-24 minutes, serve hot and bubbly
Stuffed Round Zapallito
Posted in A bit about me, Vegetable (main dish) | Tagged bread crumbs, crushed red peppers, eggs, garlic, mixed peppers, onion, Parmesan cheese, parsley, pepper, sea salt, zapallito, zucchini | Leave a Comment »
Older Posts »


